 ..the cat came back..
Recently Written
- Kiosk Browser Grows Up, Goes Pro
- Android App: Simple Kiosk Browser
- Widget, it’s got a widget…
- LinkUSB(i) and 1-Wire setup
- I am an IAMS cat
- LG TV Serial Control
- Tivo Return to UK Via Virgin Media
- Another Android Security Update
- Pictures from Computex 2009
- Pull That Squidgy iPhone application
- Extra Cupcake, Still No Latitude
- G1 Assault on battery
- Everywhere you go, always take the weather with you
- Pachube dials without the heartache
- Dynamic Dials Disclosed
- Gratifying Graphic Gizmos
- Current Cost Capers
- One Wireduino made easy
- WordPress tweetbacking
- What the UK VAT Reduction really means
Categories
- 1-Wire

- android
- arduino
- computex
- freerunner
- hardware
- image builds
- iphone
- kiosk
- learning
- linux
- neo 1973
- openmoko
- opensource
- personal
- software
- VoIP
Archives
- November 2011
- July 2011
- May 2011
- January 2011
- October 2010
- November 2009
- July 2009
- June 2009
- May 2009
- April 2009
- March 2009
- February 2009
- January 2009
- December 2008
- November 2008
- October 2008
- September 2008
- August 2008
- July 2008
- June 2008
- April 2008
- March 2008
- February 2008
- January 2008
- December 2007
- November 2007
- October 2007
- September 2007
Admin
Search
May
20
Widget, it’s got a widget…
13 years ago, mid-May | Leave a Comment
John Smiths have a lot to answer for there I can tell you.
It’s been a busy few weeks at work while 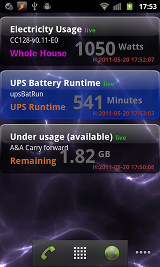 we launch our revamped online shop and how did I go about relaxing? I did more development work at home. Since we’ve moved into our house I haven’t really had a lot of time to do much development, more tiling grouting and renovating than anything else. This last week though, as we started to get on top of things, I took some time to put together a widget for Android. I’ve been collecting, storing and graphing data from various sensors around the house for some time now and while the graphs are pretty they aren’t really a quick or efficient way of reading the status at a glance.
Step forward the widget. Each widget requests XML data from the server and presents it on the widget, this allows an infinite number of widget variations since the only change is the data received. In other words, if it’s in the database it can be served. The widget itself has a number of coloured backgrounds which the server data can trigger if and it’s also capable of playing an alarm sound if required. I still need to fix this because the alarm sound triggers on each update and there’s currently no way to tell the widget to be quiet.
Update: Fixed this, tapping the widget will silence it until the next alarm trigger ie once the state returns to normal and then alarms once again.
Incidentally, since I only have a self signed certificate on my server but still wanted encrypted access I had to extend the DefaultHttpClient. By default Android will just refuse to connect to a server if the certificate isn’t signed by one of the ‘trusted’ certificate authorities – it wont tell you that it refused, it’ll just silently fail. You’d only ever really know if you’d connected to your device via adb and done a logcat. You can get round this by adding a keystore to your application, which is good enough for testing or personal applications.
If you want to do this you need to make sure you have the Bouncy Castle cryptography jar in your CLASSPATH. The first thing you’ll need is a copy of the certificate which I hope you’ve generated and installed on your server. If you need to get a remote server certificate you can use the following command (all one line).
echo | openssl s_client -connect your.server.goes.here:443 2>&1 | sed -ne '/-BEGIN CERTIFICATE-/,/-END CERTIFICATE-/p' > mycert.pem |
Replace the “your.server.goes.here” with your server, obviously. Once you’ve done that export the CLASSPATH to the Bouncy Castle jar you downloaded replacing the path I’ve used with the location you downloaded it to:
export CLASSPATH=bcprov-jdk16-146.jar |
You can now use the following script, note that the keystore name is appkeystore.bks as on line 3
1 2 3 4 5 6 7 8 9 10 11 12 13 14 15 16 17 18 19 | #!/bin/bash CERTSTORE=appkeystore.bks if [ -a $CERTSTORE ]; then rm $CERTSTORE || exit 1 fi keytool \ -import \ -v \ -trustcacerts \ -alias 0 \ -file <(openssl x509 -in mycert.pem) \ -keystore $CERTSTORE \ -storetype BKS \ -provider org.bouncycastle.jce.provider.BouncyCastleProvider \ -providerpath /usr/share/java/bcprov.jar \ -storepass MyPaSsWoRd |
Replacing the MyPaSsWoRd on line 19 with a password of your choosing, you’ll need it later too. If you run the script you should get some output like this, obviously with your server information – remember to answer yes to the “Trust this certificate” prompt.
Owner: EMAILADDRESS=info@ automated.it, CN=www.automated.it, OU=Tech, O=Automated IT, L=Eye, ST=Suffolk, C=GB Issuer: EMAILADDRESS=info@ automated.it, CN=www.automated.it, OU=Tech, O=Automated IT, L=Eye, ST=Suffolk, C=GB Serial number: 4dce9c74 Valid from: Sat May 14 16:15:00 BST 2011 until: Sun May 13 16:15:00 BST 2012 Certificate fingerprints: MD5: 32:0F:33:0C:42:8D:FF:78:90:46:31:7A:4F:D3:33:23 SHA1: BD:A8:B8:21:B1:48:C3:53:BB:01:22:65:9E:00:6E:14:7B:DE:4E:F6 Signature algorithm name: SHA1withRSA Version: 1 Trust this certificate? [no]:yes Certificate was added to keystore [Storing appkeystore.bks] |
Create a directory called “raw” in your project’s ‘res‘ folder and copy the appkeystore.bks file to it.
In your Android application or widget you can now create a new class for the following code which will extend the original DefaultHttpClient class. You’ll want to change the package name on line 1 to match your application.
1 2 3 4 5 6 7 8 9 10 11 12 13 14 15 16 17 18 19 20 21 22 23 24 25 26 27 28 29 30 31 32 33 34 35 36 37 38 39 40 41 42 43 44 45 46 | package your.package.name.here import android.content.Context; import org.apache.http.conn.ClientConnectionManager; import org.apache.http.conn.scheme.PlainSocketFactory; import org.apache.http.conn.scheme.Scheme; import org.apache.http.conn.scheme.SchemeRegistry; import org.apache.http.conn.ssl.SSLSocketFactory; import org.apache.http.impl.client.DefaultHttpClient; import org.apache.http.impl.conn.SingleClientConnManager; import java.io.InputStream; import java.security.KeyStore; public class myHttpClient extends DefaultHttpClient { final Context context; public String UserAgent="Android dataWidget (ScaredyCat 0014150511-0.1b) [http://blog.automated.it]"; public myHttpClient(Context context) { this.context = context; } @Override protected ClientConnectionManager createClientConnectionManager() { SchemeRegistry registry = new SchemeRegistry(); registry.register( new Scheme("http", PlainSocketFactory.getSocketFactory(), 80)); registry.register(new Scheme("https", newSslSocketFactory(), 443)); return new SingleClientConnManager(getParams(), registry); } private SSLSocketFactory newSslSocketFactory() { try { KeyStore trusted = KeyStore.getInstance("BKS"); InputStream in = context.getResources().openRawResource(R.raw.appkeystore); try { trusted.load(in, "MyPaSsWoRd".toCharArray()); } finally { in.close(); } return new SSLSocketFactory(trusted); } catch (Exception e) { throw new AssertionError(e); } } } |
Note that the password used in the script earlier should match the one on line 37– use your own different password in production for security purposes. You can now use the class as required in your application, for example:
1 2 3 4 5 6 7 8 9 10 11 12 13 14 | myHttpClient httpclient = new myHttpClient(context); httpclient.getCredentialsProvider().setCredentials(new AuthScope(host, port), new UsernamePasswordCredentials(username,password)); BasicHttpContext localcontext = new BasicHttpContext(); BasicScheme basicAuth = new BasicScheme(); localcontext.setAttribute("preemptive-auth", basicAuth); httpclient.addRequestInterceptor(preemptiveAuth, 0); HttpHost targetHost = new HttpHost(host, port, scheme); HttpGet httpget = new HttpGet(url); httpget.setHeader("User-Agent", httpclient.UserAgent ); |
Once I’d got the SSL connection I could get the application to download a list of sensors from the database, this only happens the first time the first widget is added to the home screen. I need to sort a way of allowing the user to delete the list if more sensors are added. At the moment clearing the data for the widget application works but it erases the widget settings too.
When I’m at home I want to connect to a local server for the information for the widgets and when I’m out and about (using a 3G connection) I want to connect to an external server. I implemented the ability to automatically switch when my phone connected to my WiFi access point. One final thing I did was to add the ability to long press on a text field and then select ‘Save as default‘ allowing things like servers, Wifi MAC address, username and password to be saved as the defaults for all widgets.
![]()
![]()
![]()
![]()

Tagged with: 1-Wire • android • currentcost • opensource • software
May 20, 2011 21:10
Jan
18
LinkUSB(i) and 1-Wire setup
13 years ago, mid-January | 2 Comments
I’ve just configured my monitoring machine to use a LinkUSBi 1-Wire interface and it’s a rather simple process. First of all we’ll setup One Wire File System, or OWFS ") for short, then we’ll add some udev rules and finally plug in a device and get some readings. Since we need to build OWFS we’re going to need a new libraries and files installed, I’m making the assumption that you already have automake, autoconf, autotools-dev, gcc, g++ installed so you can go ahead and install the libraries we need.
for short, then we’ll add some udev rules and finally plug in a device and get some readings. Since we need to build OWFS we’re going to need a new libraries and files installed, I’m making the assumption that you already have automake, autoconf, autotools-dev, gcc, g++ installed so you can go ahead and install the libraries we need.
apt-get install libtool libusb-dev fuse-utils libfuse-dev swig python2.6-dev tcl8.4-dev php5-dev
You don’t actually have to have Python, Tcl or php5 installed if you don’t want them they add to the interfaces you can use with OWFS – unless you specifically don’t want them you may as well include them. Once the installs above have completed you’ll need to get a copy of OWFS – be sure to download the latest version of it.
Update : I’ve rolled back to using 2.8p4 since 2.8p5 seems to have some problems with owserver (owfs still works fine).
Once you’ve downloaded you’ll see the file is called something like owfs-2.8p5.tar.gz – this file name is made up of owfs-[version of owfs].tar.gz In my case I have version 2.8p5. Your version may differ, don’t worry about that (unless it’s older!). Now extract the tarball with
tar -zxvf owfs-2.8p5.tar.gz
replacing the file name with whichever version you downloaded. This will extract a lot of files and place them in a directory with the same name as the file you downloaded, minus the ‘.tar.gz’. Move to that directory with
cd owfs-2.8p5
now we need to run the configure and make scripts. First configure, if this fails make sure you have all the dependencies required.
./configure
this will spit out reams of text which really only matters if something goes wrong. The last few lines should be something like this
Current configuration:
Deployment location: /opt/owfs
Compile-time options:
Caching is enabled
USB is enabled
I2C is enabled
HA7Net is enabled
W1 is enabled
Multithreading is enabled
Parallel port DS1410E is enabled
TAI8570 barometer is enabled
Thermocouple is enabled
Zeroconf/Bonjour is enabled
Debug-output is enabled
Profiling is DISABLED
Tracing memory allocation is DISABLED
1wire bus traffic reports is DISABLED
Module configuration:
owlib is enabled
owshell is enabled
owfs is enabled
owhttpd is enabled
owftpd is enabled
owserver is enabled
ownet is enabled
ownetlib is enabled
owtap is enabled
owmon is enabled
owcapi is enabled
swig is enabled
owperl is enabled
owphp is enabled
owpython is DISABLED
owtcl is enabled
Now we build OWFS using make
make
After some churning, spewing output, cpu usage and warning messages (ignore them), which may all take 10 minutes or more depending on your cpu and memory, you should get your prompt back. Finally install owfs – do this as root.
make install
Since we need to mount the OWFS somewhere we create a directory
mkdir /var/lib/1wire
Ok, so now we come to the hardware side of things – I got my LinkUSBi from HomeChip – the ‘i’ variant has it’s own identity which may or may not be useful to you. If I’m honest I accidentally picked the ‘i’ version and could have easily saved 80 pence and gone for the non-‘i’ version without trouble – Quick Note, as I write this Quinten has had some issues that need investigation, he has the non-‘i’ variant – for now I’d stick with the ‘i’ variant that we know works. I’ll update once I get more information about the issue. Turns out that version 2.8p4 of OWFS worked with the LinkUSB for Quinten. The LinkUSB or LinkUSBi is the interface to 1-Wire devices, so now’s the time to plug it in. Be aware that if you have other FTDI devices you might want to set up some udev rules. This is what I have in a file called /etc/udev/rules.d/60-usb-serial.rules
# /etc/udev/rules.d/60-usb-serial.rules

# Determine XBEE, Current Cost and 1wire USB ports
KERNEL=="ttyUSB*", \
ATTRS{idVendor}=="0403", ATTRS{idProduct}=="6001", ATTRS{serial}=="A600eD0C", \
SYMLINK+="1wire"
KERNEL=="ttyUSB*", \
ATTRS{idVendor}=="067b", ATTRS{idProduct}=="2303", \
SYMLINK+="currentcost"
KERNEL=="ttyUSB*", \
ATTRS{idVendor}=="0403", ATTRS{idProduct}=="6001", \
SYMLINK+="xbee"
Since I have 3 USB serial devices, a currentcost unit, some Xbee based wireless 1-wire devices I made and the LinkUSBi, two of which are FTDI I need to identify each so use the ATTRS{serial} to uniquely identify the LinkUSBi via its serial number. You can glean the serial number by using
lsusb -vv
and look at the output for the serial number of device you’re interested it. Once our LinkUSBi is connected and detected we can mount OWFS with
/opt/owfs/bin/owfs -d /dev/1wire -m /var/lib/1wire
Note that I use -d/dev/1wire because my udev rules create a symlink. If you don’t create the symlink then your device will be something like /dev/ttyUSBx – where x = a number. Now we can look at any attached devices with
# ls /var/lib/1wire/

01.BA0E0E140000  28.1842A1020000  alarm  bus.0	settings  simultaneous	statistics  structure  system  uncached
The 01.XXXXXX device is the LinkUSBi and the 20.XXXXX device is a DS18S20 temperature sensor. To read the output of the temperature sensor we simply do
cat /var/lib/1wire/28.1842A1020000/temperature

16.0625
As you can see the temperature is a rather chilly 16.0625 degrees Celsius. Stuart Poulton has some 1-Wire kits available to buy for creating some domestic environment friendly temperature sensors and Quinten has some good pictures of them. Kevin has also got some newer pictures up – thanks for the headsup Kevin.
Tagged with: 1-Wire • linux • opensource
January 18, 2011 20:47
Mar
1
Gratifying Graphic Gizmos
15 years ago, at the start of March | 2 Comments
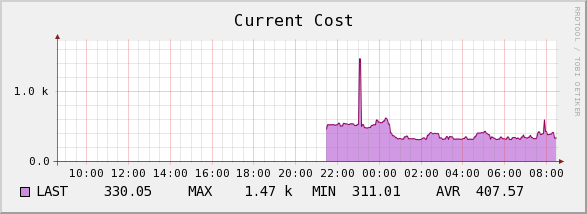
Yesterday the Current Cost unit actually got installed for real, something I was dreading. Dreading not because it was a difficult thing to do but simply because I expected the figure it would show would be terrible. Guess what, it wasn’t. In fact it seemed to be fairly close to that of other people who are monitoring theirs. The initial figure of 371 Watts didn’t last too long once the dishwasher and oven came on and an interesting spike appeared when the hob went on for the kettle.

Continuing with my sudden graphing fetish, as well as using a Current Cost unit I have dotted a number of little devices I’ve built with Xbee and Arduinos to measure temperatures (and other things) around the house. More information on those will come out later, but it’s an interesting project too.
Since I have the data for those it’d be rude not to graph them too, there’s a sample in the thumbnails below.
Not content with graphing them locally I picked up a Pachube invite and started graphing data there too. The process is simple really and as you can see on the right hand side of this page under ‘Graphy Stuff’, graph images can be embedded in your own or other sites. The really interesting thing about Pachube is that you can share your data with people who may be interested. The data they get to see is delayed by approximately 15 minutes. If you output your data in the eeml format then you can specify your own tags too.

Tagged with: 1-Wire • arduino • development • environment • hardware • monitoring • Pachube • software
March 1, 2009 8:47
Feb
4
One Wireduino made easy
15 years ago, at the start of February | 12 Comments
For a very long time now I’ve been playing with the Arduino boards but it wasn’t until I recently discovered some DS1820 1-wire chips in my parts box that I started even thinking about 1-wire stuff. Connecting 1-wire devices to the Arduino is, well, amazingly simple. Using the sample circuit from the datasheet we can see the connections are few and far between.

Please note that this is the corrected circuit, previously the VDD was not tied to ground. While the circuit would work it would only give reliable results on very short runs. This circuit allows longer runs to the sensor.
Coding this up is also made extremely easy with the OneWire library. I’ve put together a little application below that will read all of the 1-wire devices on a bus. If you press L in the Arduino IDE serial monitor it will list all the 1-Wire device id’s and if you press T you’ll get the id and temperature reading.
1 2 3 4 5 6 7 8 9 10 11 12 13 14 15 16 17 18 19 20 21 22 23 24 25 26 27 28 29 30 31 32 33 34 35 36 37 38 39 40 41 42 43 44 45 46 47 48 49 50 51 52 53 54 55 56 57 58 59 60 61 62 63 64 65 66 67 68 69 70 71 72 73 74 75 76 77 78 79 80 81 82 83 84 85 86 87 88 89 90 91 92 93 94 95 96 97 98 99 100 101 102 103 104 105 106 107 108 109 110 111 112 113 114 115 116 117 118 119 120 121 122 123 124 125 126 127 128 129 130 131 132 133 134 135 136 137 138 139 140 141 142 143 144 145 | /* Simple 1-wire device reading Pass T over serial to get temperatures Pass L to list 1-wire devices */ #include <OneWire.h> #include <stdio.h> #define CONVERT 0x44 #define READSCRATCH 0xBE #define SKIP_ROM 0xCC #define MATCH_ROM 0x55 OneWire ds(10); // The DS18S20 is connected on pin 10 int ledPin = 13; // flash an led on 13 - we all like flashing lights void setup(void) { // initialize inputs/outputs // start serial port Serial.begin(9600); pinMode(ledPin, OUTPUT); //we'll use the led to output a heartbeat } void loop(void) { int incomingByte = 0; if (Serial.available() > 0) { // read the incoming byte: incomingByte = Serial.read(); // say what you got: //Serial.print("I received: "); //Serial.println(incomingByte, DEC); if (incomingByte == 84) { getStuff(); Serial.print("\r\n^"); } else if (incomingByte == 76) { listDevices(); } } } void listDevices(void) { byte addr[8]; ds.reset_search(); while(ds.search(addr)) { digitalWrite(ledPin, HIGH); // sets the LED on if ( OneWire::crc8( addr, 7) == addr[7]) { if ( addr[0] == 0x10) { // Make sure it is a DS18S20 device char buffer[512]; sprintf(buffer,"Id:%02x%02x%02x%02x%02x%02x%02x%02x\r\n", addr[0], addr[1], addr[2], addr[3], addr[4], addr[5], addr[6], addr[7]); Serial.print(buffer); } } } Serial.print('^'); } void getStuff(void) { byte i; byte present = 0; byte data[12]; byte addr[8]; char buff[15]; float real_temp; float temp_count; float read_temp; ds.reset_search(); while(ds.search(addr)) { digitalWrite(ledPin, HIGH); // sets the LED on if ( OneWire::crc8( addr, 7) != addr[7]) { // Check CRC is valid Serial.print("CRC is not valid"); } if ( addr[0] != 0x10) { // Make sure it is a DS18x20 device Serial.print("Device is not a DS18x20 family device."); } ds.reset(); // Reset device ds.select(addr); // Select device ds.write(CONVERT,1); // Issue Convert command delay(1000); // maybe 750ms is enough, maybe not digitalWrite(ledPin, LOW); // sets the LED off present = ds.reset(); // Reset device ds.select(addr); // Select device ds.write(READSCRATCH); // Read Scratchpad for ( i = 0; i < 9; i++) { // we need 9 bytes data[i] = ds.read(); } if(OneWire::crc8( data, 8) == data[8]) { // Check CRC is valid // CRC is ok // Divide the temperature by 2 - note the » and // « need to be replaced with double < and > // wordpress kills the server when you try to // save otherwise. read_temp=((data[1]«8) | data[0]) » 1 ; // Convert to real temperature temp_count=float(data[7] - data[6])/(float)data[7]; real_temp = ((float)read_temp-0.25)+temp_count; // Convert float to ascii tempToAscii(real_temp,buff); char buffer[512]; sprintf(buffer,"%02x%02x%02x%02x%02x%02x%02x%02x %s\r\n", addr[0], addr[1], addr[2], addr[3], addr[4], addr[5], addr[6], addr[7], buff); Serial.print(buffer); } else { Serial.println("CRC Failed"); } } void tempToAscii(double temp, char *buff) { int frac; //get three numbers to the right of the decimal point frac=(unsigned int)(temp*1000)%1000; itoa((int)temp,buff,10); strcat(buff,"."); //put the frac after the decimal itoa(frac,&buff[strlen(buff)],10); } |
There’s also a copy of the .pde file that you can download if you feel more inclined. It’s not an exact copy, I removed the commented out xml for the above version. It’s worth pointing out that this circuit is using what is called parasitic power, which means your cable run should be shortish. If you want to use an external power supply then pin 3 (VDD) on the DS18S20 should go to your external supply. This would allow for much longer runs of cable. Below is an example graph generated by cacti with 2 DS1820’s connected the the arduino. As you can see the temperatures aren’t exactly the same but this is to be expected since the accuracy of the DS1820 is +/- 0.5 ° C

The breaks in the graph were caused my me removing the USB plug from the PC it was connected to so that I could make some minor alterations to the circuit.
Josh asked how I was getting the input for Cacti, here’s the perl script I use
1 2 3 4 5 6 7 8 9 10 11 12 13 14 15 16 17 18 19 20 21 | #!/usr/bin/perl $output = `echo -en "T" >>/dev/ttyUSB0 && cat /dev/ttyUSB0`; @lines = split(/\r\n/,$output); $t=1; foreach $line (@lines) { @spl = split(/\s+/,$line); $lc = @spl; if ($lc gt 1) { $node=$spl[0]; $val=$spl[1]; print "Temperature_$node:$val "; } $t++; } |
This outputs Temperature_x:n where x is the 1-Wire id and n is the temperature. It could probably do with tidying up and if you wanted to you could pass the 1-Wire id to the script to and only output the temperature for that particular 1-Wire device. A copy of the exported Cacti template can be downloaded, I’m hoping that you just need to import that into your Cacti after placing the script in the scripts directory. Just remember, under linux, if you unplug and replug in your Arduino you may need to set the tty port speed to 9600 (or whatever you put in your Serial.begin(); ). You can use the following command for that;
1 2 3 | stty -F /dev/ttyUSB0 cs8 9600 ignbrk -brkint -icrnl -imaxbel -opost -onlcr -isig -icanon -iexten -echo -echoe -echok -echoctl -echoke noflsh -ixon -crtscts |
Make sure that ttyUSB0 is what your Arduino is connected to first. If not you will need to change it in the perl script and on the line above.
Tagged with: 1-Wire • arduino • hardware • opensource • software
February 4, 2009 21:46
Current Electricity Use (15min)
iPhone/Webkit RSS Reader
Links
- automated home
- Automated It Technology News
- awooga!!!
- LinITX
- My Acer page
- My Asterisk pages
- My Work in progress (old)
- Noble Race Car
- openmoko / neo 1973 wiki
- planet openmoko
- Spadgecock Cumpants
Tags
1-Wire android api Apple arduino currentcost DDAR development DVD FIC freerunner G1 google Google Phone gphone gprs GPS hardware image image builds inspiration iphone jailbreak kiosk linux Mac monitoring Music neo 1973 Nokia openmoko opensource OSX Pachube personal qtopia rhubarb rikki Rio slimp3 slimserver software tracking Trolltech u-bootTwitpic
Graphy Stuff


